Setting Up a Rotating Graphics Display Profile
Scenario: You want to monitor the status of multiple devices or, for example, the conditions of multiple rooms in a building. You want this monitoring capability displayed on a large screen in a common area where there is no user-interaction (no keyboard or mouse.) For example, the lobby of a hotel or business.
You can configure a KIOSK station with a rotating display of select graphics for the user to visually monitor the status or conditions of these devices/spaces.
In this workflow, you will modify an existing client profile for the rotating graphics display.
Workflow diagram:
Reference:
For related background information, see the reference section.
Prerequisites:
- You have a project with graphics you want displayed on a rotation.
- You have designated the user and Client Profile for the rotating graphics display.
Steps:
To modify the client profile of the user you have designated for the rotating graphics display, copy the following text to configure the rotating graphic display.
The text below contains sample text that you will overwrite with your own graphic or viewport path/names.
============COPY TEXT BELOW===========================
<Default>
<Option name="EnableRotatingKiosk" value="true"/>
</Default>
<CustomData>
DefaultIntervalForKioskMode: 20
KioskAutoRestart: true
KioskAutoRestartInterval: 90
GraphicListKioskMode: Paste the Designation Path for Graphic or Object 1 here;
GraphicListKioskMode: Paste the Designation Path for Graphic or Object 2 here;,20
</CustomData>
============END OF COPY TEXT===========================
- System Manager is in Engineering mode.
- In System Browser, select Management View.
- Select Project > System Settings > Users.
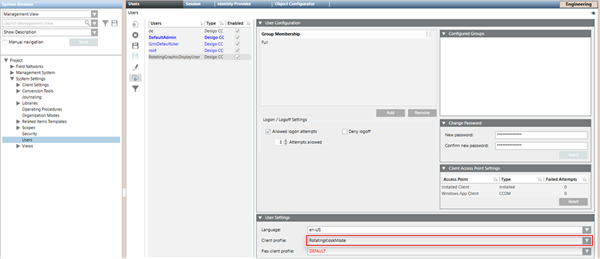
- In the Users tab, select the designated user group, and in the User Settings section, the Client Profile for the user displays.
- Note the user name as this is the client profile you will modify for the rotating graphic display.
- You have copied the graphic rotating display text from Step 1 of this workflow.
- You have identified the designated user’s client profile for the rotating graphic display.
- On the server workstation, navigate to <Installation Folder> \ GMSProjects > \ <YourProject> \ Profile
- In your preferred text editor, open the client profile (.LDL) of the user identified in the previous step.
- The client profile opens in the text editor.
- In the profile, search for the following:
<SnapIn id="GraphicViewer">.
- In that section, scroll down to
<SnapInConfigs>,press ENTER on the keyboard,
- Leave the EnableRotatingKioskMode option value set to True.
NOTE: If this property is set to False, the graphic rotation is disabled.
- In the <CustomData> section, configure the properties as follows:
a. DefaultIntervalForKioskmode – Type a value in seconds to specify the length of time a graphic displays before moving to the next graphic. If no value is provided, the default is “30” seconds. The minimum interval time is “10” seconds.
In the copied text, the time is set to “20” seconds.
b. KioskAutoRestart – If set to True, this enables an automatic restart of the rotating graphic display if it is paused by a user during runtime.
NOTE: If this property is set to False, rotation will not resume after it has been paused. In this case, the user has to log out of Desigo CC and log back in to restart the rotation display.
c. KioskAutoRestartInterval – If the KioskAutoRestart is enabled, type a value in seconds for the amount of time after which a paused graphic rotation resumes. The default time and minimum allowable restart time is set to “90” seconds. If no value is provided, the default time is used.
- To display all the graphics and viewports in the user’s Application View > Graphics folder, delete all the entries in the copied text that start with GraphicListKioskMode: and proceed to the last step to save the client profile.
NOTE: The location of any object in System Browser that has a Related Item graphic can also be used. For example a device data point, or device.
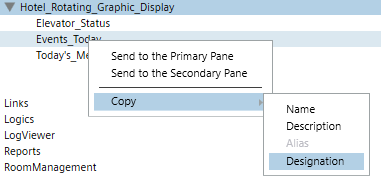
- To display a customized set of graphics and viewports in the rotation, each one must be listed in the client profile. In System Browser navigate to and then right-click on the graphic you want to display, and from the context menu select Copy > Designation.
- In the client profile file:
a. Highlight and right-click on the following sample text, “Paste the Designation Path for Graphic or Object 1 here;”, and then click Paste from the context menu.
NOTE: Each graphic must be listed on one line without line breaks.
b. (Optional) To change the default display time for the graphic, after the “;” type a comma (,) and then type the override value in seconds. Sample text for “Object 2” is an example of a graphic with a customized override time.
- Repeat Step 8 and Step 9 until you have entered all the graphics and viewports for the rotating display.
- Save the client profile according to your text editor.
- The Client Profile is now configured for the rotating graphic display. Ensure the intended user is associated with the modified profile. When the user logs on and selects the associated node in System Browser, the graphic rotation is initiated.
In order to automatically start the rotating graphics display when the designated user logs in, you can set the System Browser Graphic node, or any node that is associated with the graphics you want to display, as the Favorite.
- Log in to Desigo CC with the user account associated to the rotating graphic display.
- In System Browser, select a node from any view with a graphic associated to it. It can also be an individual node in the Application View > Applications > Graphics.
- With the Graphics node still selected, from the System Manager Navigation bar, select Favorite Location
 and hold for two seconds.
- The Graphics node is now set as the application that displays in the Primary pane when the associated user logs in to the rotating graphics display station.
- Log out of Desigo CC.
- You have configured the client profile .LDL of a designated user with the rotating graphic display.
- Login to Desigo CC using the designated user account for the rotating graphic display.
- In System Browser, navigate to and select the graphic or object node designated for the rotating display.
- The rotating graphic display is initiated.
- If you have set the rotating graphic display node as the Favorite in the previous optional step, the rotating graphic display will start automatically upon logging in.