Setting up the Web Client
Scenario: You want to set up and work with the Web client on the Desigo CC Server with local web server (IIS) or on the remote web server (IIS) hosted on the Desigo CC Client/FEP.
For working with the local Web Client on the local web server (IIS) you can leave the web communication as Local.
For working with the remote Web Client, it is recommended to secure the communication between the Desigo CC Server and the remote web server (IIS).
In this workflow for securing the communication between the Desigo CC Server and the remote web server (IIS) Windows store based certificates are used.
It is recommended to secure the communication with the self-signed certificate. Alternatively, you can also use the host certificate.
For working with the Web Client, follow the Cybersecurity Guidelines (A6V11646120 ).

Validity of Self-Signed Certificates
Self-signed certificates allow local deployments without the overhead of obtaining commercial certificates. When using self-signed certificates, the owner of the Desigo CC system is responsible for maintaining their validity status, and for manually adding them to and removing them from the list of trusted certificates.
Self-signed certificates must only be used in accordance with local IT regulations (several CIO organizations do not allow them, and network scans will identify them). Importing the commercial certificates follows the same procedures.
You must ensure the compliant installation of the trusted material on the involved machines, for example, on all Installed Clients. In some organizations, this must be done by the IT organization.
Reference: For background information, see the reference section.
Workflow diagram:
Prerequisites:
- On the Server station:
- - (Only applicable for Server with local web server (IIS)): IIS is installed and configured according to the OS installed. (see Install IIS in Complete the Installation Planning Requirements).
- You have verified the existing Application Request Routing (ARR) installation.
- (Optional) A dedicated IIS User is created and assigned to the IIS_IUSRS Group. - A project is created and the history database is linked to it.
- (Only applicable for Server with remote web server (IIS)): To set the Web Server Communication =
Securedover CCom port.
- The Windows store based root and host certificates (used for securing CCom port) are imported in the appropriate certificate store and set as default.
- The root certificate (.cer file) of the CCom host certificate is available in the Trusted Root Certification Authorities (TRCA) store of the Local machine certificates store.
- The CCom host certificate's subject name must match the server name configured in the Client/FEP project.
- If a multi-host certificate is used as a CCom host certificate, then the Subject Alternative Name (SAN) property must contain all its possible host names. - On the remote web server (IIS) hosted on Client/FEP station:
- The user that you are about to configure as a web application user is
- a member of the IIS_IURS group and
- added in the list of allowed users in the Project Shares expander of the linked Server project.
- (Only applicable when the project that you are about to link to the web application is in distribution with other projects) added in the list of allowed users in the Project Shares expander of all the systems (projects) in the distribution with system (project) linked to the web application. - The root certificate (.cer file) of the CCom host certificate of the linked Server project, is imported in the Trusted Root Certification Authorities (TRCA) store of the Local machine certificates store.
- You have stopped the Default IIS Website using SMC.
- (Only applicable only for the third-party websites/web applications) You have reviewed the tips for working with the third-party websites and web applications.
- The website/web application certificate:
- (recommended) Use the default set self-signed certificate or the self-signed certificate created at the time of website/web application creation.
- The self-signed certificate is imported in the Personal, as well as the Trusted Root Certification Authorities store of Local machine certificates in the Windows Certificate store.
- If a host certificate is used as a website/web application certificate, the host (.pfx) along with its exportable Private key and its root (.cer file) are imported in the appropriate Windows Certificate store. Otherwise, a chain validity message displays.
- As a host certificate is issued for the host name provided in the Host name field during website creation. Otherwise, you may encounter a Network Error (dns_unresolved_hostname).
- If a multi-host certificate is used as a website/web application certificate, then the Subject Alternative Name (SAN) property must contain all its possible host names. (see Add Entries in the V3.txt File for Creating a Multihost Certificate). - To run the Web client or Windows App client on IPv6 network enabled systems, see Configure the Web Server to Run on the Dual-Stack (IPv4 and IPv6) Network.
Steps:
- Navigate to the path [installationdrive:]\[installationfolder]\GMSMainProject\bin.
- Right-click and edit the StartSmc.bat file in a text editor such as Notepad, or Notepad++.
- Append \EnableXbap switch at the end.
For example, start Siemens.Gms.ApplicationFramework.exe /M:GMS /L:SMC.ldl \EnableXbap.
- Save the file.
- You have enabled the Web Client by the adding the \EnableXbap switch.
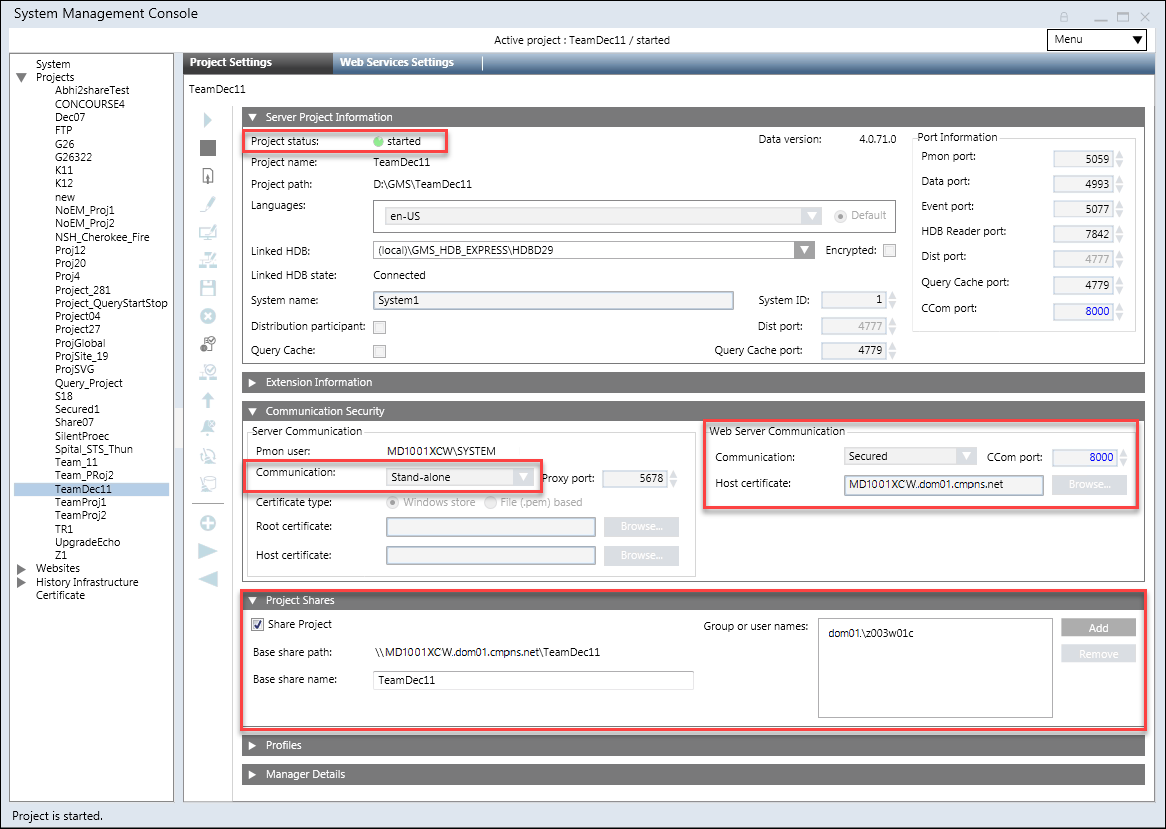
For Launching Web Client on the remote web server (IIS), it is recommended to set the Server Communication as Stand-alone and the Web Server Communication as Secured in the Communication Security expander in SMC. For Server with a local web server (IIS), you can, however, leave the Server Communication as Stand-alone and the Web Server Communication as Local.
You also must share the Server project with the website/web application user using the Project Shares expander.
- In the SMC tree, select Projects > [project].
- Click Edit
 .
.
- Some fields of the Server Project Information and Communication Security expanders are enabled.
- In the Communication Security expander, do not modify the default (
Stand-alone) Communication mode.
- In the Communication Security expander, provide the Web Server Communication details as follows:
- For working with local web server (IIS): Change the default Communication mode (
Disabled) by selecting Local from the drop-down list. This enables the communication between the CCom port and web server (IIS), without certificates.
- For working with remote web server (IIS): (recommended) Change the default Communication mode as Secured from the drop-down list. This enables a secured communication between the CCom port and web server (IIS).
- Configure a unique the CCom port number, if required, by changing the default.
- (Applicable only for Web Server Communication as Secured) Verify the default set host certificate for CCom port. For more information, see tips.
- Using the Project Shares expander, you need to share the Server project with the website/web application (IIS) user as follows:
- Select the Share Project check box to share project folder of the current project.
- If required, type in the Base share name to change the default set, the Project name.
- Click Add to add the website/web application user to the list of Group or user names using the Select User or Group dialog box.
- Click Save Project
 .
.
- If you have changed the Communication Security settings including the Web Communication mode, CCom port, or a CCom Host certificate, a message displays indicating you that you must align the Web applications on Client/FEP linked with this modified Server Project.
Using SMC you can create a new website on Server with local web server (IIS) or on remote web server (IIS) hosted on Client/FEP.
- In the SMC tree, select Websites.
- Click Create Website
 .
.
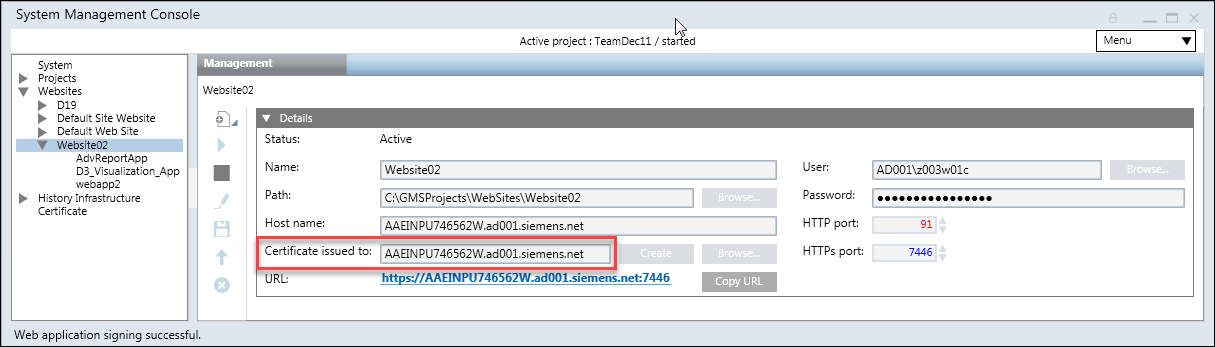
- In the Details expander, enter the website details as follows:
a. Type a unique name for the website.
b. Click Browse to change the default location [installation drive:]\[installation folder]\[WebSites] and to store the website files at desired location.
c. Enter the host name: Full computer name, DNS name or IP address of the local host (web server IIS).
d. In the Certificate issued to field, it is recommended to use the default set self-signed certificate
Alternatively, you can create a new self-signed certificate by clicking Create, if no default self-signed certificate is already set. or
Click Browse to select a host or self-signed certificate from the Personal tab of the store location Local machine certificates using the Select Certificate dialog box. (see Tips for Selecting a Certificate for a Web Site)
e. Browse for and select a website user using the Select User dialog box. This user must be a member of the IIS_IUSRS group. Otherwise, a message displays asking you to add the selected user to the IIS_IUSRS group, or to select another user from the IIS_IUSRS group.
f. Enter the password of the selected website user.
g. Do not change the default port number for the HTTPs port unless you have already configured a website that uses that same default port number.
To change the HTTPs port number, type or use the UP and DOWN arrows to specify a port number in the range of 443 through 65535.
- Click Save .
- A confirmation message displays.
- Click OK.
- The website is created, activated, started, displayed as a child under Websites in the SMC tree and is selected by default.
NOTE: If a website creation fails, and on opening the SMC log file, located at
C:\GMSProjects\GMSMainProject\log, the SetPermission exception displays (see Unable to Set Security Permissions on Websites/Projects Folder).
For other website and web application troubleshooting topics, see the Troubleshooting section.
- The HTTPs website URL, when clicked, opens the Desigo CC web page in the default browser. However, you can launch a Web Client only using a web application URL.
You can also copy the website URL using the Copy URL button and paste it in the browser.
- It internally also enables the Proxy for the Application Request Routing (ARR) Cache in IIS which is required for Windows App client connectivity.
Validity of Self-Signed Certificates
Self-signed certificates allow local deployments without the overhead of obtaining commercial certificates. When using self-signed certificates, the owner of the Desigo CC system is responsible for maintaining their validity status, and for manually adding them to and removing them from the list of trusted certificates.
Self-signed certificates must only be used in accordance with local IT regulations (several CIO organizations do not allow them, and network scans will identify them). Importing the commercial certificates follows the same procedures.
You must ensure the compliant installation of the trusted material on the involved machines, for example, on all Installed Clients. In some organizations, this must be done by the IT organization.
- The website under which you want to create the web application is created, started and selected in the SMC tree.
- Click Create Web Application .
- (On Server with local web server (IIS)) The Server Information expander displays the name of the server and is read-only.
(On remote web server (IIS) SMC) You can add the Server information using Automatic or Manual configuration mode.
NOTE: Ensure that the server name in the Server Information expander is same as the subject name of the CCom Host certificate (configured for Web Server Communication) on the Server. If you get a message stating that theServer is not available, see troubleshooting steps.
For Automatic configuration mode, in the Server Information expander, proceed as follows:
a. Type the full computer name of the Server, for example ABCXY022PC.dom01.company.net.
or click Browse and select the server name using the Workstation Picker dialog box.
b. If required, edit the Server service port to match the service port number on the selected Server. The default port number is 8888.
c. Click Projects to browse for and select a project on the configured Server using the Project Information dialog box.
- In the Project Information: Web Server Communication expander, the Server project name, the Communication mode, and the CCom port number are configured according to the linked Server project.
- The linked Server project’s system name and the project path also display.
In a distributed environment, in addition to the linked System’s name (the system name associated with the project linked to the web application), the System names of all the projects in distribution with the project linked to the web application also display.
- In the Web Application Details expander, proceed as follows:
a. In the Name field, enter a unique name for the web application.
NOTE: By default, the website user you configured is the web application user.
b. Click Browse and select a different web application user from the one you selected while creating the website using the Select User dialog box. The web application user must be a member of the IIS_IUSRS Group. If you select a user that is not a member of the IIS_IUSRS Group, the SMC prompts you to add the user to the IIS_IUSRS Group.
NOTE: For working with the Web Client, the web application user must be added to the list of allowed users in the Project Shares expander.
c. Enter the password of the web application user.
d. Do not change the default path is [installation drive:]\[installation folder]\[Websites]\[Website name], unless you want to change it using Browse.
NOTE: For a third-party website created on a root drive, do not create a web application under the website on the (same or a different) root drive in SMC. Otherwise, you cannot launch the Desigo CC web page and an HTTP 404 error message displays.
e. Use the default self-signed certificate that displays in the Certificate issued to field or
click Browse and select the certificate for the web application using the Select Certificate dialog box. The web application certificate can be different from the web site certificate.
Select a certificate from the Personal tab of the store location Local machine certificates or User Certificates.
The certificate must have a Private key and it must be exportable (see Tips for Configuring a Web Application Certificate).
f. Select the Enable XBAP check box if you want to launch Desigo CC through the WebClient. For this, you must ensure that the web application is created by selecting the XBAP Client check box. On selection, a message informing you that the XBAP Web Client is not recommended and the supported version if you need to install it displays.
- Click Save .
- A confirmation message displays.
- Click OK.
- The web application data is validated and a new web application node is created as a child of the selected website under Websites in the SMC tree. A corresponding child node is created in IIS.
A web application folder containing the ClickOnce folder is created at the path specified while creating the website.
- A read-only web application URL for https, when clicked, launches a web page for launching Web client in your default browser a secured environment.
Alternatively, you can copy the web application URL using the Copy URL button, launch the browser such as Microsoft Internet Explorer 11, and in the address bar, paste the web application URL to launch web page for the Web Client.
The System use notification files are copied from \GMSProjects\GMSMainProject\Data\SMC\ to
GMSProjects\WebSites\[Websites]\[Web application]\ClickOnce
GMSProjects\WebSites\[Websites]\[Web application]\XBAPFullTrust
GMSProjects\WebSites\[Websites]\[Web application]\FlexClient folder
")
 Hosted on Client/FEP")
You can launch a Web Client by browsing the web application link on the local web server (IIS) or on the remote web server (IIS) hosted on a Client/FEP or on remote computer other than web server (IIS). For this you must install the website/web application certificates in the appropriate Windows certificate store.
You can launch the Web Client by browsing the website or web application URL using only Internet Explorer 11 onwards.

NOTE:
Microsoft recommends upgrading and staying up-to-date on the latest Internet Explorer browser version. Only the most current version of Internet Explorer available for a supported operating system will receive technical support and security updates.
The following procedure provides the steps for launching the Web Client for the very first time by installing the website certificates. The steps may vary; for example, the Certificate Error: Navigation Blocked page may not display, if the website/web application certificate is already installed.
- You have reviewed the tips before launching the website or web application URL.
- In the SMC tree, select the website or web application.
NOTE: Clicking the website/web application URL in the SMC results in opening the Desigo CC web page in your default browser. It is recommended to launch the Web Client using Windows browser Internet Explorer 11 onwards.
- Click Copy URL to copy the HTTPs URL of a website/web application.
- Launch the Windows Internet Explorer browser (Internet Explorer 11 onwards).
- In the address bar, paste the copied URL.
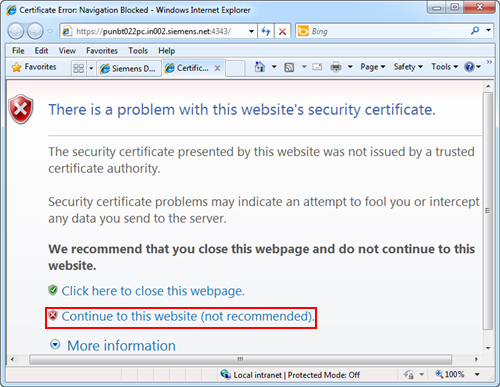
- The Certificate Error: Navigation Blocked page displays. This error occurs if the self-signed or host certificate is not already available in the Windows Certificate stores. Usually this error does not occur for the commercial certificates.
- Close the IE 11 browser.
- Re-launch the web application HTTPs URL.
- The error message
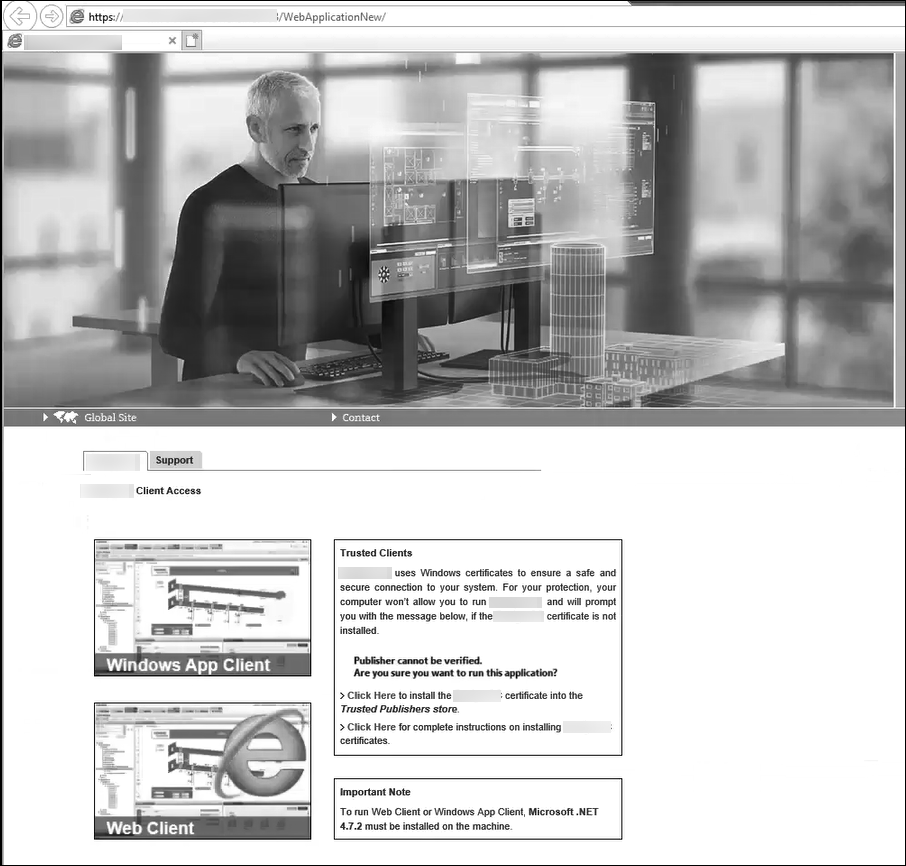
Certificate Error:Navigation Blockeddisappears and the Desigo CC web page with thumbnails for web and Windows App clients displays.
NOTE: The thumbnail for Web Client displays only if you have created the web application using the Enable XBAP option.
- Install the web application certificate for verifying the signature when downloading the application in the appropriate Windows certificate store.
- From the Desigo CC web page, launch a Web Client by clicking the Web Client thumbnail and follow the onscreen prompts (in the section on Starting and Exiting the System, see Launch a Web Client).
- You have created a website or web application using SMC and the URLs (HTTPs) are available.
- You have not installed the certificate used in the website.
- Browse the website or web application HTTPs URL in the Windows Internet Explorer 11 browser.
- The Certificate Error: Navigation Blocked page displays due to an untrusted certificate.
- Click Continue to this website (not recommended).
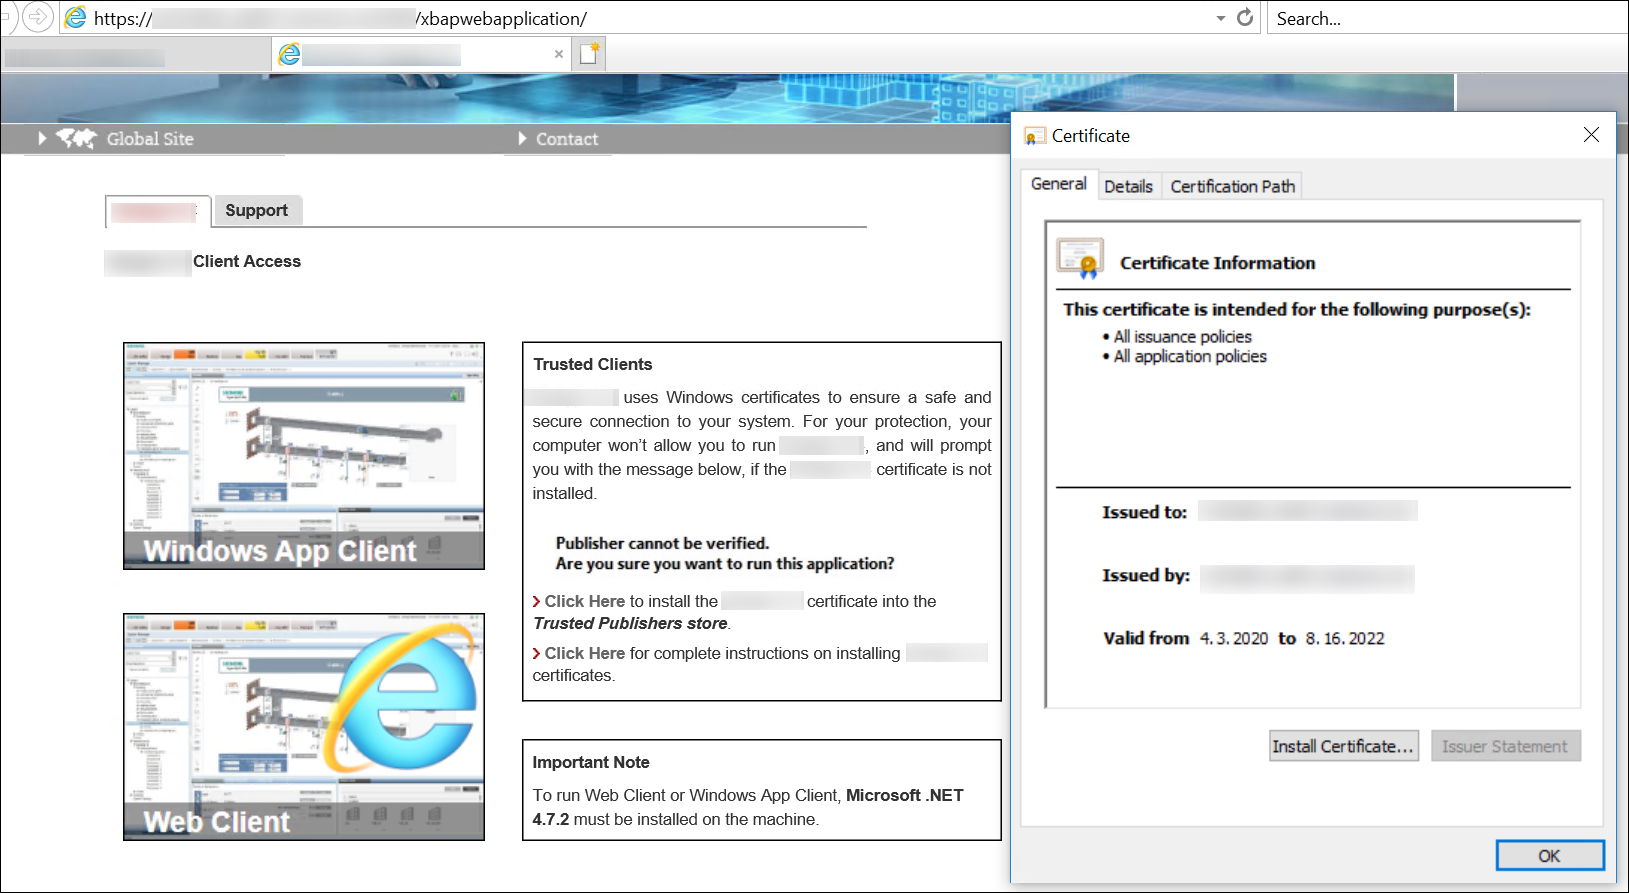
- In the Desigo CC web page address bar, a Certificate Error security report displays.
- Click Certificate Error to open a menu that contains a View certificates hyperlink.
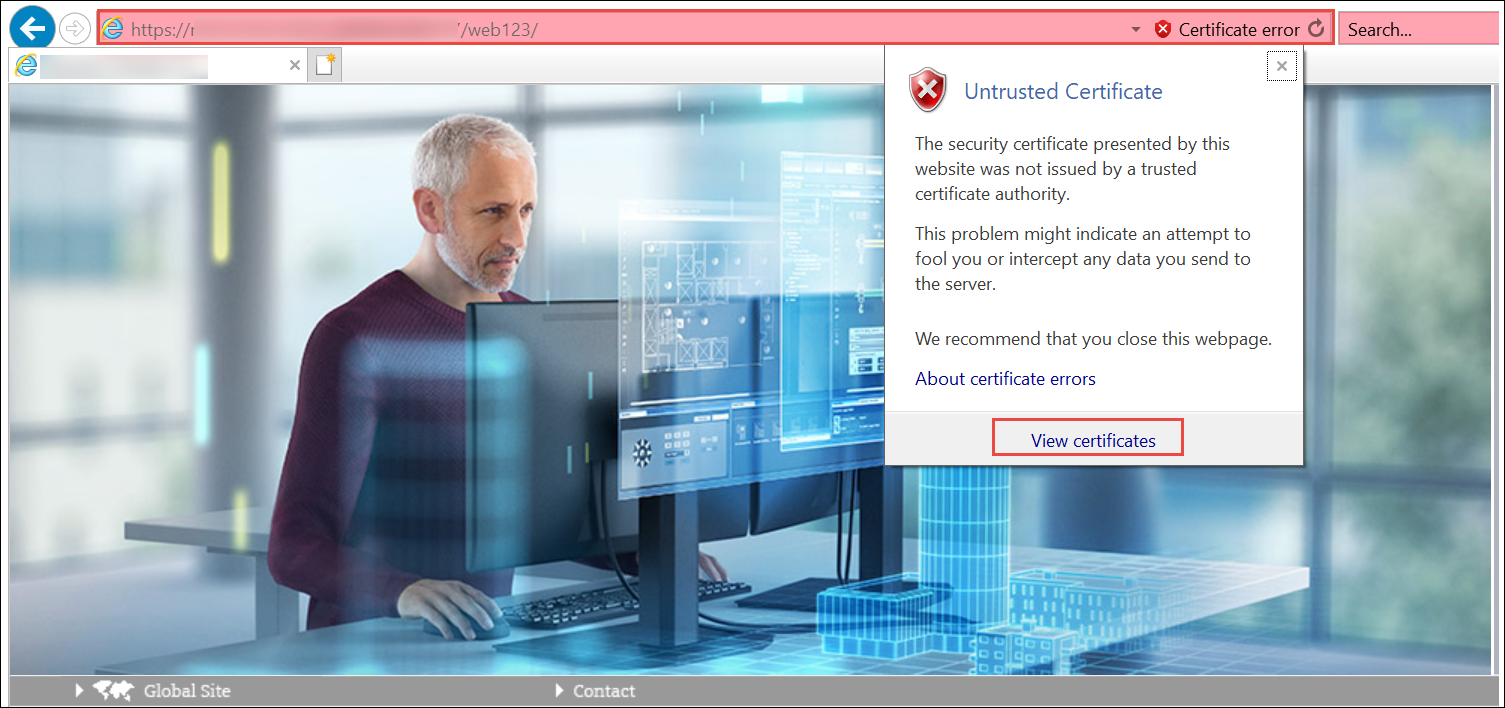
- Click View Certificates.
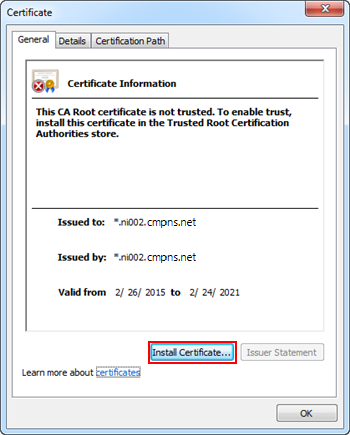
- In the Certificate dialog box that displays, click Install Certificate.
NOTE: The same website/web application certificate (host/self-signed) that was provided during website/web application creation, displays and you can proceed with installing it in the TRCA store. However, in order for the host certificate to work with the Web Client, you must import the root of the host certificate that you used while creating website in the TRCA store.
- Depending on the type of certificate used, proceed with importing the certificate as follows:
- If the certificate you used while creating a website is a self-signed certificate, then you must install it in the Trusted Root Certification Authorities store.
- If the certificate you used while creating a website is a host certificate, then you must install the root certificate of the host in the Trusted Root Certification Authorities store.
NOTE:
If the Certificate Error: Navigation Blocked page displays, even after installing the website certificate, then verify that the Subject Alternative Name (SAN) property for the selected certificate contains the host name specified while creating the website.
For example, if the website Host name field contains the full computer name, ABCXY022PC.dom01.company.net, then the certificate provided in the Certificate issued to field must contain the full computer name ABCXY022PC.dom01.company.net as one of its names in the SAN property.
The certificate you select while creating the web application is the same certificate that you must install in the certificate store under Current User > Trusted Root Certification Authority and Current User > Trusted Publisher certificate before launching the Web Client. You can do this using the following procedure.
- You have created a web application using SMC and the HTTPs URLs display.
- The Desigo CC web page is open in the Windows Internet Explorer browser, and the Desigo CC tab contents are displayed.
- Do one of the following:
- In the Desigo CC web page, click the Click Here link on the Desigo CC page for a web application.
- In the Desigo CC web page, click the Support tab, and then select the Web Client Application Certificate link.
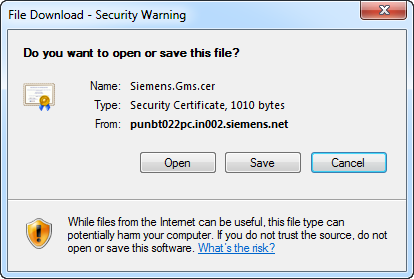
- In the File download – Security Warning dialog box, click Open.
- In the Certificate dialog box, click Install Certificate.
- Depending on the type of certificate used, proceed with importing the certificate by doing one of the following:
- If you used a self-signed certificate while creating a web application, then you must install it in the Trusted Root Certification Authorities and Trusted Publisher Windows Certificate store.
- If you used a host certificate while creating a Web Application, then you must install it in the Trusted Publisher Windows Certificate store. You must also install the root certificate of the host in the Trusted Root Certification Authorities store.
NOTE: If host certificates created with SMC are used for signing the Web Application and the Internet browser is configured to check the publisher's certificate revocation, the Security Warning message may display, even after installing the certificate. In this case, you can either add the website to the Trusted Sites zone to resolve the issue or ignore the warning and click Run (for Web Client).
Do this procedure to start Desigo CC as a browser-based application (Web Client).
- You have installed the security certificate on the computer where you are working with Web Client.
- Launch Microsoft Internet Explorer 11 onwards.
- In the address bar of the browser, paste the web application URL.
- The Desigo CC page opens in the browser, and the Desigo CC tab contents display.
- In the Desigo CC tab, click the Web Client thumbnail for launching the Web Client.
- The logon dialog box displays in the browser.
- Enter your username and password.
- Select the domain.
- Click Logon.